Workshops

Wednesday, January 27, 2016

4th Grade Texture Printed Cityscapes!


This lesson is vintage...my mother, Judy Bowerman,  taught this lesson and made the printing blocks over 25 years ago! She took a bunch of random rectangle wooden blocks and glued textured wall paper to them with wood glue.  They have lasted this long!!! And now, the texture from the wall paper is no longer visible. The blocks print the texture of layer tempera! But, they still create a stunning project.  This is one of those that EVERY student has a high level of success.  The best part of this project... easy clean up!  Just let the blocks dry! No washing!


Students move tablet to table to change colors.  I have a set of blocks for each table. 


Week two, I cut up different sizes of cardboard and chip board, whatever is available to print the windows, doors, details.  And even a building that never existed before! Students LOVE this lesson and they all turn out great! I hope you try it!


Tuesday, January 26, 2016

5th Grade Loose Weavings


Loose Weaving is a very successful and fun one day project for 4th or 5th graders who have experience weaving.  You can weave with any paper, I chose to use up some of my painting mats and some painted paper I used for a past project. 

Everyone approaches this project differently, this is how I teach it...  Start with a horizontal and vertical strip perpendicular, with the horizontal strip on top. (I do teach warp and weft, but too confusing to use those terms for this weaving lesson).


Next, add two more vertical strips, both on top of the horizontal.


Next, Add a horizontal strip on top and bottom of the original horizontal strip by simply lifting the center vertical and sliding it in snug.  Once students get this far, the strips are starting to hold themselves together.  Then they continue with no trouble, following the rules of weaving... over, under, over, under.... and under, over, under, over! Have fun!


Tuesday, January 19, 2016

4th Grade Mandalas with Chalk Pastels


Let me start by saying... the technique I used, wet paper with chalk pastels was borrowed by a great art teacher Phyllis Levine Brown, aka There's a Dragon in my Art Room.  I learned of this great technique in a workshop she presented at NAEA.  Here is the link to her lesson on her blog, (There's a Dragon in My Art Room).

In her workshop, Phyl shared that she would soak "bogus paper" in the sink and have students draw with chalks on top... no chalky mess, the chalks stick to the wet paper.  Several of us had taught at least 15 years.  We all looked at each other and whispered.... "What is BOGUS PAPER???" LOL!  It is grayish thick construction type paper.  I had never noticed it in the catalogs, but YES, it is there! So I ordered a bunch!  It is becoming a new favorite!  It works just like Phyl said it would!

This lesson, I introduced Tibetan Mandalas. Might seem familiar... I used the same powerpoint to  teach the 3rd Grade Radial Designs lesson which follows this blog post.  Two very different looking lessons with similar starting points.  (Mandala Prezi)

This time... I kept the paper square, folded it in fourths like the circle. We started the designs in the center, working out on the folds, the filing in the rest.  But this time with black paint.  I also changed the technique a bit.  Rather than soaking the paper, I had students use water and brushed to apply water then color the area with chalk pastels.  It worked great for this lesson.  Had I soaked the paper, our black tempera would have run.  We finished the project with a layer of Mod Podge, again recommended by Phyl.  The results are great!  I truly love LEARNING a totally new method in my 18th year.... just gets me all excited to try more!


Thursday, January 7, 2016

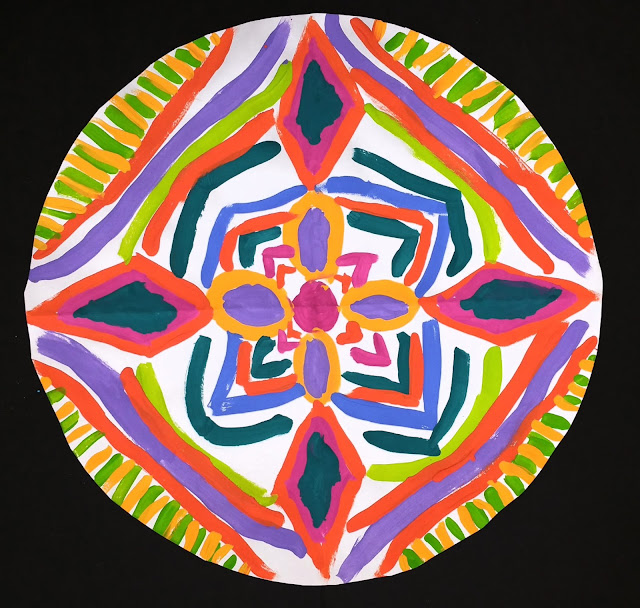
3rd Grade Radial Designs in Paint inspired by Tibetan Mandalas


This lesson is ALWAYS successful... and for EVERY student.  I have used different artists or techniques as inspiration over the years.  This time, we looked at Tibetan Mandalas.  I showed students a Prezi I created on the Smartboard, (Mandala Prezi).  I found a great time lapse video of Tibetan Monks creating a sand mandala.  The kids love it!  Feel free to borrow!

These are large, I have a 17" matt board circle. I pre-trace them on 18x18 white 80lb paper for all my students.  After the Prezi, they cut them out. I have them fold the circle in half like a taco, then in half again like a quesadilla.  Then open and smooth out. We start painting a circle or square in the middle, where the folds cross.  Then paint 2-4 shapes ON THE FOLD to start the symmetry design. Always working from the center out, each shapes has to bump into the previous. I encourage students to turn the circle as they paint, always painting the shape with the same movement for consistency. After that, we start working in the middle of the sections, starting in the center again, working our way out.  Students rotate around the room in a circle, we always rotate the same way to start projects.  First day, we got around the room once. 6-7 tables.  Next class, (the stop motion video), I demonstrate how to take the design further.  Filling the space with more lines and shapes, maintaining symmetry.  Using pattern to fill in larger spaces or outline with extra colors around spaces.  I let students move freely for this portion of the lesson.  This way they can choose colors and take more time if needed.  Rules.... not more than 6 per table and no papers are allowed to overlap!  This is a project that builds confidence.  Students are always impressed with themselves in the end!  I have to say a lot of, "WOW! That is awesome! Beautiful!"  My favorite kind of project!!! :)


Here is a time laspe video of day two. 


Tuesday, January 5, 2016

ONE DAY - Keith Haring hits the Slopes Mural!


Right before winter break, I had one of those awkward days where I taught one day of students who were done with current projects and not mentally prepared to start anything new.  I was also in need of something more wintery to hang quick.  So.... we made a one day Keith Haring Snowboarder Mural! 

This was not a "real project"... I did not spend much time talking about Keith Haring. I had a couple visuals on the smart board for a visual reference and shared the basics. They all liked his work and were ready to create!

I had students focus their time on designing a creative snowboard. So, they traced MY Keith Haring figure patterns on to colored construction.  Most students had time to make 2 snowboarders.  They loved it!  Most the work was for me... I spent my workday changing the large boards.  Taking down the old mural and hanging this one for the next several weeks.  I love adding texture to a board when I can.  It is not overwhelming, just a hint.  But it makes a rather simple concept look more finished!