

My students love weaving, boys, girls, they ALL love it! I highly recommend weaving a pouch with 4th grade and up... That is, if you have nice class sizes, (less than 25) and a group of DOERS! You do not want to do this project with whiney, slow procrastinators. You always have a couple of those even with the best groups, but the doers get them going!
If you have NEVER taught weaving on a loom with yarn, start small. Flat looms first, then maybe circle looms and then move to small pouches, ( 4"x 6"). The weaving is the easy part, especially if students are doing it well and not making too many mistakes. I have woven for many years with students and have seen EVERY tangly mess you can imagine! You have to be prepared to have some serious mistakes, and ready to handle them. Then YOU will enjoy the weaving as much as your students.


Here is how I get started...


The best materials for making the loom is either cardboard, or heavy chipboard. I made mine this year with a heavy poster board... I regret it. I should have taken the time to have the kids bring in a cereal box, which works great! Or pizza box cardboard, single layer. Double layer is too thick.
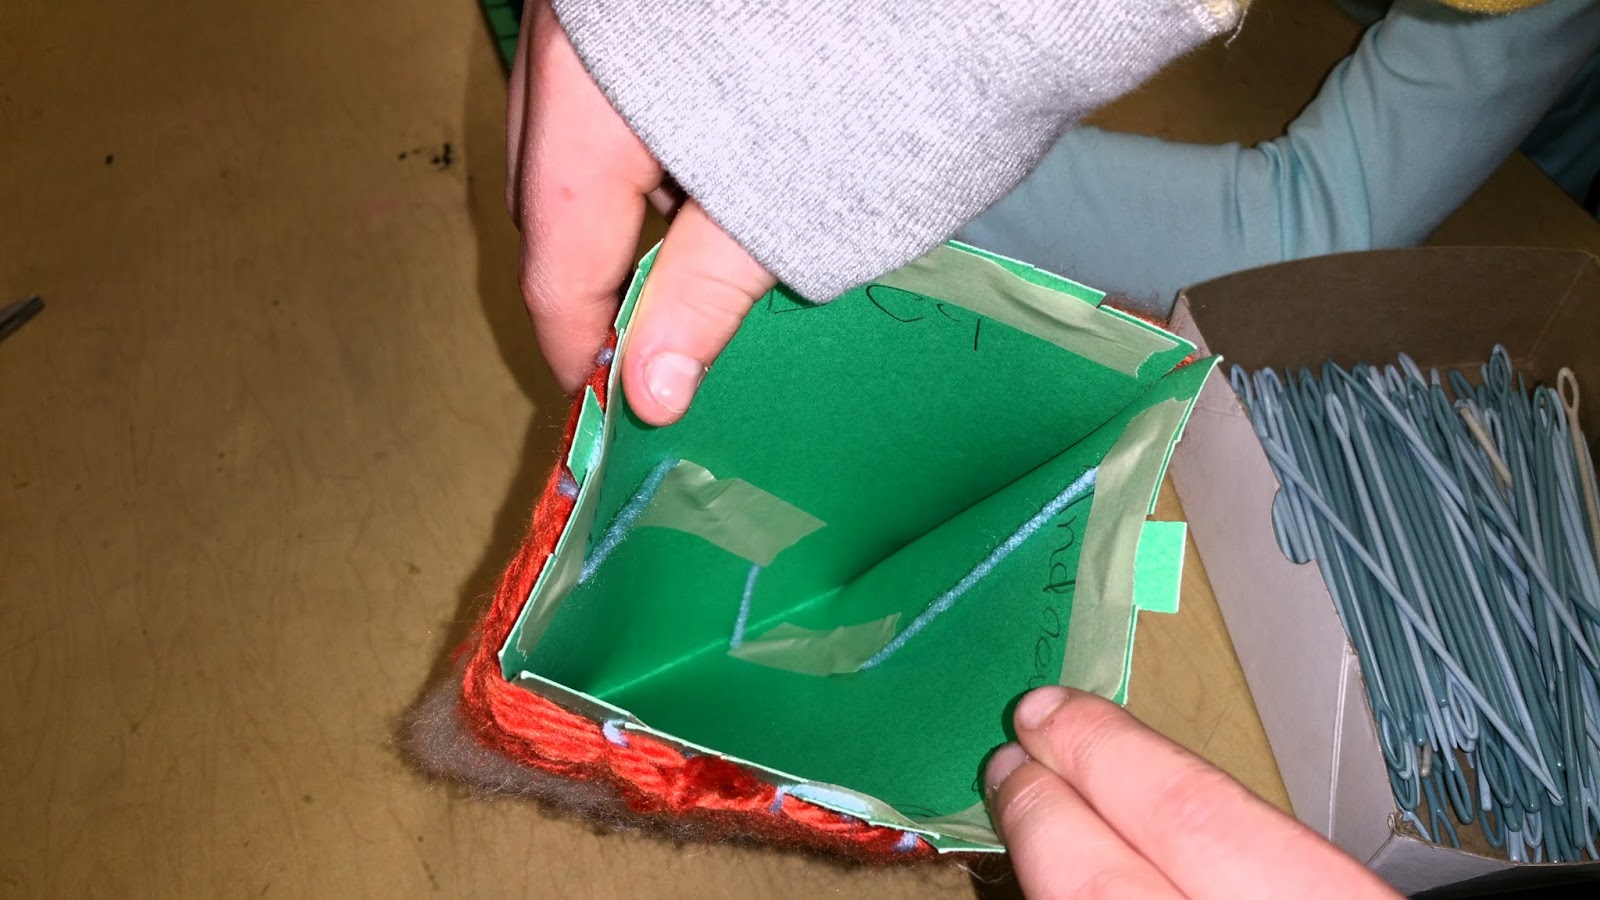
I make a loom by cutting 2 pieces the same size and taping the bottom so it can fold shut.
I cut an even number of tabs at the top on both sides, while the loom is closed. I cut 10 times on this sample, if you cut more, stronger bag. However, more than 10 starts getting a bit complicated for a first time weaver. Once they finish a bag, if they want to make a tighter woven bag at home, I show them how to make their own looms.


To string the loom with the warp, tape a LONG length of yarn on the inside of the loom. Take the yarn and put it through the first tab on the side you taped to. Close the loom, but try to keep it open with a finger preventing it from closing all the way. Pull the yarn down and wrap the bottom edge, go up to the opposite first tab and loop the yarn AROUND the first tab, then bring it down... wrapping the edge again, going back to the first side to wrap around the second tab.


When finished, cut a long end and table inside the loom. The loom must be PERFECT! All perfectly vertical lines! Outside has the warp, inside has the loops as shown above.

Yet, it should be able to open.


Your ready to weave! I recommend weaving with JUMBO yarn! It goes much faster and is easy for first time weavers to manipulate. I get mine at our local Meijer's store. They have scanes of jumbo yarn for $2.99. I spend about $200.00 on yarn for this project. It is not a cheep project for a larger bag!
To tie on, tie one end to the right side for right handers, left side for left handers. Once you are through... over, under, over, under... then flip the board top continue in a big circle around the loom.


The first 5 times around are the hardest. Students are learning they have to pull the slack through each time, sometimes they forget... And they are sometimes pulling too hard, making the warp slide to the side. You have to demonstrate the do's and don'ts for them. No reason to push it down until around a good 10 times. Then YOU become the pusher.... cramming the weft down when they are not doing it very well.

When there is about 8" or more of yarn left, time to tie on a new piece. Demonstrate SLOWLY how to tie on... students struggle to do this. I tie on new pieces a lot, it keeps the weaving going. They do eventually get it, most of them.

If you want to weave faster, double the yarn. Cut off a long length and match the ends, then tie on. It does go WAY faster to double a reasonable thickness of yarn. Something that will still go through the plastic needles.


How to take off the loom...
I like to wait for at least 5 students to be complete with the weaving before teaching how to take off the loom. Once I teach these 5 students, I give them the responsibility to teach to teach the others. This makes the process MUCH easier on me, plus it gives this group of students a chance to master a craft! I tell students... the last couple times around the loom should be difficult slow, that means the pouch is tightly woven and ready to come off the loom.
The 3 spots to tie-off the loom...
Tie-off the weft to the warp with a SINGLE layer of yarn - Once at the end, you need some length to pull back a loom and tie a knot. So below, I am tying the white weft to a blue warp at the top. Double knot.

Tie-off the weft to the warp with a DOUBLE layer of yarn - Once at the end, pull on of the ends back under one of the warp, knot the two ends together like you would to tie a shoe. Double knot, very easy. Trim ends.

Tie-off the warp taped on the inside of the loom - Pull off all the tape and take the ends off the loop on the warp on BOTH sides.
On each side of the loom, tie-off the warp yarn to the least weft yarn by making a loop and tying a knot. Then double knot. Many weavers will simply weave the warp into the weaving. For an experienced weaver, that will work. For kids, they feel like the bag will fall apart. And it might! they are just learning and there were likely some mistakes that can make the bag weak. So I tie-off EVERYTHING. It can be a painful process teaching it, but the students are better for it. Many do not know how to tie anything! They learn! Or you have a couple great helpers help with the process if you do not have the time to spend on tying. A pick your battle situation!

How to fix two common problems...
1. A student accidentally wraps the yarn around a side and continues weaving. If it is only a couple rows down, I would make the student unweave and fix it.

If they continued weaving, unaware of the mistake, I make a quick fix by cutting the wrapped yarn in half...

Then, I tie off the mistake on both sides onto a warp thread.

It looks like new yarn was tied on, looks much better!
2. A student tied on new yarn and did not pull the new yarn through as they continued weaving. It leaves this large loop. This student did it twice! It often happens when the knot from tying on new yarn gets stuck on the warp. They think it has pulled through. THE NEED TO LOOK until the knot is fully woven through!

Cut the yarn in half...

Tie the ends together if a double loop. If not, loop around a warp thread and knot.

Looks much better!!!
How to attach a handle...

Cut the length of yarn you wish to have for a handle. I suggest a couple extra inches. It is always easier to cut excess than add. Tie the handle on to a BOTTOM corner or the pouch. Double knot, then put a large plastic needle on the other end.

Once tied on, start stitching or weaving the needle up the side of the bag. It truly does not matter how many times, but I suggest "over/under" 10 times or more.

Once through the top, start back down the other side... Over/under at least 10 times. WHen you reach the bottom of the bag, pull and end through long enough to tie around a couple weft strands. DOuble knot. And now your.... DONE!
This is what they look like when they are done...


They are soooo happy!!!! They will say over and over, this is there FAVORITE project they ever made. Even over clay!
Here is what it looks like in action!


Love the group shots! HAH! Nice work kiddos!
ReplyDeleteGreat project you do not go into how to finish? I assume you put it inside out, how do you deal with the loops?
ReplyDeleteYou are right!!! Thanks for letting me know. I will add the finishing details tomorrow!!! I do have the students turn the bags inside out. It is the quickest way to hide the knots. Some need to be pushed back through even flipped. Details on the way!
DeleteUpdated!!!!
DeleteI'm curious of how you manage the yarn. Last year I pre-cut all of the weft and it was SO much work and became messy because kids would pull them out of the bags in big bunches. This year I have the skeins in laundry baskets with the tails sticking out of the holes in the side. It seems to be going alright but takes a bit more time since they have to cut it themselves. I guess it is better than trying to have them clean up the huge mix and match yarn pieces all over the place at the end of class. What is your method?
ReplyDeleteIt is not very organized... I have a BIG IKEA bag that I throw all the skeins into. I let them cut their own yarn. At the end of class I stress softly wrapping them all up so that they do not tangle. It is okay... I have seen some great ways to organize the yarn, the laundry basket idea sounds good, I should try it. But I have never master that area of weaving with students! I tend to put a couple students in charge of making it look amazing... they do a decent job. :)
DeleteI've found the magic method of yarn organization!!! (Very excited, as this seems to be the bane of many an art teacher and I just learned about this through a fellow art teacher friend). You know those 2-part plastic apple cartons that usually come from Costco/other bulk food grocers? Stab a yarn-sized hole in each space, wind the yarn into balls (ahem, early finisher job?), place inside of the carton with the yarn coming out through each hole, and snap the carton back together. Voila! No more tangled mess.
DeleteOh my gosh, I LOVE weaving with my kids. It always amazes me how much they love doing it, even the boys love it. (My classes are always so quiet while weaving too!) Thank you for posting the step by step photos - I love that this weaving turns into something useful. I'm definitely going to try this one!! Thank you for always sharing such great ideas!
ReplyDeleteI am looking forward to trying this lesson with my students. I have a question about the cardboard... you mention not to use the thick boards and also not to use too thin of a cardboard. So, I am guessing the thicker loom chip board is not a good match for this project?
ReplyDeleteI started one using the thicker chip board and was hoping it would work out. Is there a reason not to use the thick cardboard?
You can do it, too bendy, it will be harder for the students for the first 5-10 times around. After that it is much better. My think cardboard, was not so thick. You might have thicker, which would be much better. I still would try it! Good luck!!! It is worth the crazy moments, the kids love it!!!
ReplyDeletethis looks great but i don't see what becomes of the warp threads after they are cut...please explain...barbara
ReplyDelete